UPDATE:
In the past several months I saw a decrease in earnings. After talking with my account manager and a few others, I found a new technique you may want to consider trying. After you’ve been running the tags for awhile, take the code from your top performing post and add it to the other popular posts. This has proven successful for many. Also ask your account manager to make sure you have asynchronous codes.
Affiliate links are use in this post
I’m always trying to find new ways to increase my blog income, in big and small ways. A few months ago, I started using Media.net to bring in some extra money from a few of my higher traffic posts. I had read about this idea in the book How to Blog for Profit: Without Selling Your Soul by Ruth Soukup from the popular blog Living Well, Spending Less (which I highly recommend.) It totally made sense to put ads in your most popular posts! While you can use this method with companies other than Media.net, I would highly suggest using them for a few reasons:
- The ads can be customized to fit in with the color scheme of your blog
- They are text ads, which often look less annoying or in your face than display ads
- The RPM is very high (mine averages around $9)
- The ads quickly will change to reflect the material on the page
- Be sure to sign up using this link. Occasionally they have bonuses when you sign up through an affiliate link! Right now, you can get 10% more in your earnings for the first three months you are with them.
In the past, I’ve tried a few different methods to make money in popular posts (namely, signing up with affiliate companies who offered relavant products), and I’ve found this to be the most profitable. I make about $300 extra a month just from the two or three posts I have Media.net ads in, and that’s just with about 21,000 ad impressions.
How to Make Money on Popular Posts
So, first things first. Go sign up for Media.net. You won’t be approved immediately but usually within about a week. After you’ve signed up, you’ll need to go to Google Analytics and set the dates for about the past six months. Then, go to the side dashboard and find the section that says “Acquisition.” Expand that menu, click on the sub-category keywords, and then organic. You will now see the top keywords that bring people to your site. For me, my top two search queries are “Gluten Free Menu Plan” and “Easy Recipes for College Students.” I immediately know that people who come to my site via those keywords are landing on my 30 day Gluten Free Meal Plan or my Easy College Student Recipes post. I would recommend only picking two or three posts to put these ads on and try to have them meet these requirements:
- There is a good amount of text in the post. If it’s just a recipe with a paragraph of text and 10 photos, people aren’t going to be as likely to click on the ad, and it will probably look more out of place.
- Posts that already have a decent amount of links already in it.
Why Use Most Searched versus Most Popular overall:
- People who are in search engines are a little more “click happy” when they get to your site, so they are more likely to click on the ads. Since Media.net is a CPC model, clicks mater.
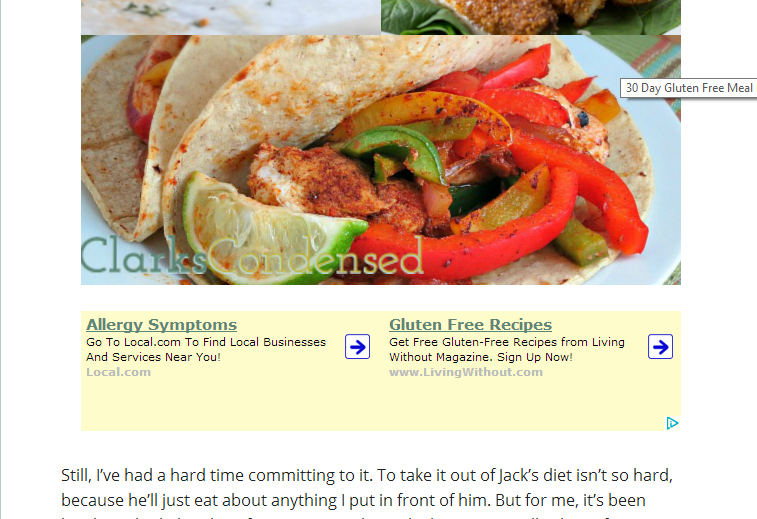
- Because your ads will display content related to the searches people use to get to that page, the ads will be much more relevant if it gets a lot of search traffic. For instance, on my gluten free menu plan post, there is almost always links to topics about gluten free diets. However, when I put a Media.net post on a very popular post (Surviving Pregnancy: The First Trimester) whose main referring source was Pinterest, the ad wasn’t nearly as relevant. Here is the ad that currently shows up on my Gluten Free menu plan post:
 So, once you know what posts you are going to use and you’ve been approved by Media.net, you can create your ads.
Creating an Effective Ad Unit in Media.Net
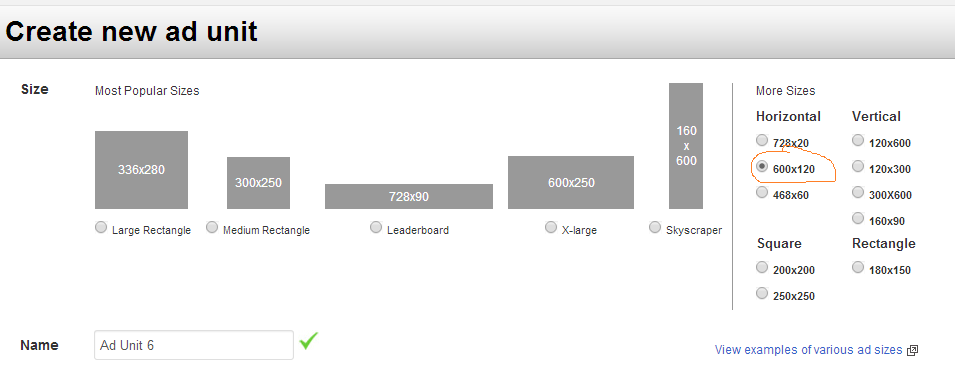
First, you will need to login to your Media.net account. At the top of the page, you will see an option that says “Ad Units.” Click on that, and then on the blue button that says “Create Ad Unit”  Here you will be given a variety of options for ad units. For the purpose of putting one in a post, I always recommend using a horizontal 600×120:
The next option will be to choose an ad skin. This is just the basic set up of the ad you will be placing on your site. You can decide based on your personal preference, but I personally always pick the first one: 
After you select an ad skin, you will be given the option to choose the color scheme for your ad. They usually give you a few different pre-set options, or you can create your own. I recommend creating your own and matching it to the color scheme of your blog so it blends in better with your site.
Then you can view the advanced options. Here is how I set them up:
- Mobile Ads: Enable
- Skin Optimization Level: Aggressive
- Back Up ads: Specify ad code for showing backup ads. I then put an ad code for Google Adsense in this section.
Then you press save and get code!
How to Place an Ad in Popular Posts
Even if you don’t use media.net, or for some reason weren’t accepted, you can still put ads in your popular posts! Some companies may not allow this but using AdSense, or something similar, should be okay. To put an ad in a post, all you have to do is go to the text editor for that post, and place the HTML code where you want it. I chose to put it beneath the first image in this post. I recommend putting it in <center> </center> tags. Centering just makes ads look nicer in my opinion. Here’s what my text looks like (the orange is the code): 
A few caveats
- It may be tempting to put these ads on a ton of different pages but doing this will cause your earnings to go down.
- These posts do need to get traffic! You can’t expect to make any money if the posts aren’t getting traffic.
Want to learn how to make even more money with your ads? Be sure to check out this tutorial on how to set up backfill for your site.
